
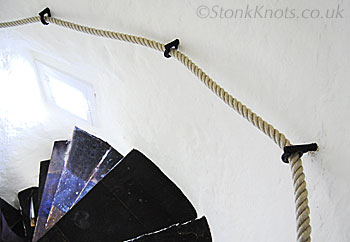
Photo credit: C.C., Kelso, Scotland
How to Measure up for a Rope Bannister
For most bannister ropes, it is a fairly simple job to measure up - just fix a length of string or rope to the wall with blu-tack or masking tape at suitable points. Then run the string along a measuring tape, noting the position of each fixing point.
We work with the rope measurement between end bracket centres. Measure the straight distance between the fittings - the weight of the rope itself will give a natural curve. If a more pronounced decorative drop is required then set the string accordingly, but remember that this will result in some give in the handrail when it is used for support.
When measuring for your staircase, bear in mind that a Manrope knot will protrude 6 to 10cm beyond the end fittings when installed, whereas an Eye splice will be within the overall measurement.

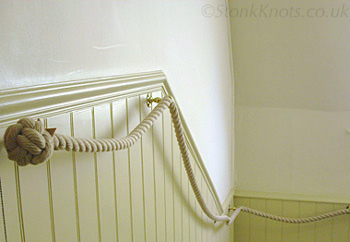
Photo credit: M.C., Souyeaux, France
How many fittings?
As a rough guide there should be a handrail fitting at every metre, ideally between 80 and 120cm, although on a steep or spiral staircase, this interval will probably be less.
Choosing the number of brackets and their position is very much a question of what looks right for your staircase, but from a practical point of view, bear in mind that the shorter the interval, the firmer the rope will feel as a handrail
Our handrails are usually supplied with end fittings in place on the rope, and centre or intermediate fitting/s fixed at at centre/even intervals, or at given measurements - according to your requirements. If you prefer to fix these in position on site, the retaining screws can be provided separately. For more details, see the installation notes on the fittings page.
Bespoke Staircase Solutions
Rope bannister installed into existing fittings
Witheridge, Devon
Ropes installed for The Marina Hotel,
Fowey, Cornwall.
A rope railing can be a flexible solution for a steep or curving cottage stairway, a restricted space in a stairwell or in an area where the handrail is to be taken around an inward or outward corner.
These situations often require more calculation (see below). You can send us details or a plan or image of your particular staircase and we will configure the measurements and number of fittings.
If you have your own fittings, and wish to send them to us, we can replace the bannister rope.

Photo credit: T.H. Belaye, France
Steep staircase considerations
The positioning of fittings on the wall is not so crucial on a shallow incline, or where the rope is deliberately left with some slack for effect.
On a steep run, with the rope straight and no drop between fixing points, the supports - including the end ones - should be set to allow the rings to accommodate the rope, at the same slant, i.e. align the ring centres to form a line parallel to the slope.
Wrought iron fittings with square baseplates require some thought before installation, particularly on a steep staircase.
The square shape of the baseplate is designed to sit as a diamond when the rope is running at 45 degrees (steep). If it is set as a square in this instance, the rope will form a kink or wave at each bracket position. This is not necessarily a problem if there is enough slack in the rope to accommodate the wave, but may be an aesthetic consideration.
Measuring for inward corners
A rope handrail can be taken across an inward right angle corner on a single bracket set on one of the adjacent walls, fairly close in, but two brackets give a kinder angle to the rope as it enters and exits the bracket ring so reducing chafe at these points over the years.
The measurements in the diagram below often work well. These account for the projection of the fittings and the arc of the rope.
Note that the rope span across the two corner brackets is half the wall measurement all the way into and out of the corner; or to put this another way, if each bracket is centred 16 cm out from the corner the span of rope between them will be 16 cm and not the 32 cm to the corner and out. For a short stem wrought iron bracket the rope span should be increased to 18cm and for a stemless bracket, to 20cm.
The layout shown on the diagram assumes a relatively horizontal line to the rope between the corner brackets: if there is a significant difference in height - such as in the hemp handrail shown here with brass fittings, then some extra allowance should be made.
To achieve this accurately, a mock could be set up with string tied to a couple of pencils (as brackets). Alternatively, if you plot the two bracket positions, we will set up the mock here.
Measuring for outside corners
An outside corner could be rounded either with a continuous length of rope supported by two brackets or with two separate ropes each terminated by a knot. With our wrought iron custom made brackets, there is also the option of using a single bracket with a corner baseplate.
When measuring for the first option, you should consider the projection of the two fittings (8cm) and the space needed for a handhold across the corner (to prevent grazed knuckles!) - bear in mind that the curve of the rope will be greater than the measurement taken on the wall. A mock up with string and pencils as described above for inward corners, would give an accurate measurement.
If it suits your design, the second, simpler method would be to use two separate handrail ropes with knots or splices ending either side of the corner.
Alternatively, a custom made corner fitting could provide a solution. These are available in wrought iron only, with a choice of finish including gunmetal, brushed steel, antique bronze, satin brass or satin white.
Examples of this bespoke work can be seen on the fittings page, under our custom built wrought iron rope handrail fittings.
Note that wrought iron brackets with square shaped base plates could affect the overall layout when used to take a rope around an inside or outside corner. Placing them in a diamond position - as used on a slope and described above - necessitates one bracket to be below another. This is not an issue on a corner arrangement along a sloped wall, but if installing these brackets on a horizontal run, they would need to be placed in their square positions to prevent the rope from kinking.
Materials and installation
It is essential to ensure the wall is sound before installing your handrail. We provide screws and rawlplugs that are suitable for most walls, although please be aware that it is your responsibility to ensure that they are appropriate for your particular installation.

Photo credit: P.L., Monterroso, Spain
Base plates on all our fittings have four countersunk screw holes for securing to the wall. The brackets will usually be fixed to the wall at an angle corresponding to the slope of the stairs; the rope on a staircase needs to pass smoothly through the rings in the fittings, without forming sharp angles.
All brass and stainless steel rope handrail fittings, and some wrought iron fittings, have round base plates and can therefore be placed on the wall in any position so that the ring of the bracket allows the rope to run comfortably through.
See the fittings installation notes for details of the wall screws we provide for each type of bracket.
An example measurement
Here is an example of a measurement taken for a rope with unequal bracket intervals. The measurements required are from bracket to bracket - each manrope knot will protrude 6 to 10cm beyond the end fitting when installed.
This layout is for a 2.7m rope bannister with a fitting at each end, two intermediate fittings at intervals of 50cm and 140cm (from left to right), and a 2 ply manrope knot at each end. The measurement can be written as / 50 / 90 / 130 / - where the forward slashes refer to the brackets and the numbers to the measurements either side.
A rope handrail costing
For the above example, the cost (using 32mm diameter hemp rope, brass brackets and 2-ply Manrope knots) would be as follows:
The price for the rope should be calculated by rounding up to the nearest half metre.
In this case, 2.7 metres is calculated at a cost of 3m of rope. (A bannister rope measurement of 2.2 metres would be calculated at a cost of 2.5m of rope.)
There is no need to account for the rope used in the knot - this is included in the price of the knot.
In this example a standard carriage charge has been calculated for a parcel weighing up to a maximum of 10kg.
A deduction of 2% on the price of the goods (excludes carriage) is applied if the payment is made by a U.K. bank transfer. Please see our order page for further details.
| 2.7m of 32mm hemp |
£ 19.00/m |
£ 57.00 |
| 4 x brass brackets |
£ 28.00 each |
£ 112.00 |
| 2 x 2ply knots |
£ 34.00 each |
£ 68.00 |
| Subtotal |
|
£ 237.00 |
| Plus Carriage to UK |
|
£ 8.75 |
|
TOTAL cost including UK carriage |
£ 245.75 |
Stair Ropes.com complete price list here
Contact Stair Ropes.com
For more advice or information about our bannister ropes and hand rails, you can contact James Watson directly. Full details on our contact page.
All content on this website is © (copyright) 1994-2026 - StairRopes.com and Stonk Knots, unless otherwise stated.
Web site design and photography by


